Simple Bike Adjustments You Can Do at Home
Knee pain, numb hands, back ache — here's how to diagnose the most common bike fit problems and fix them yourself at home, no mechanical experience needed.
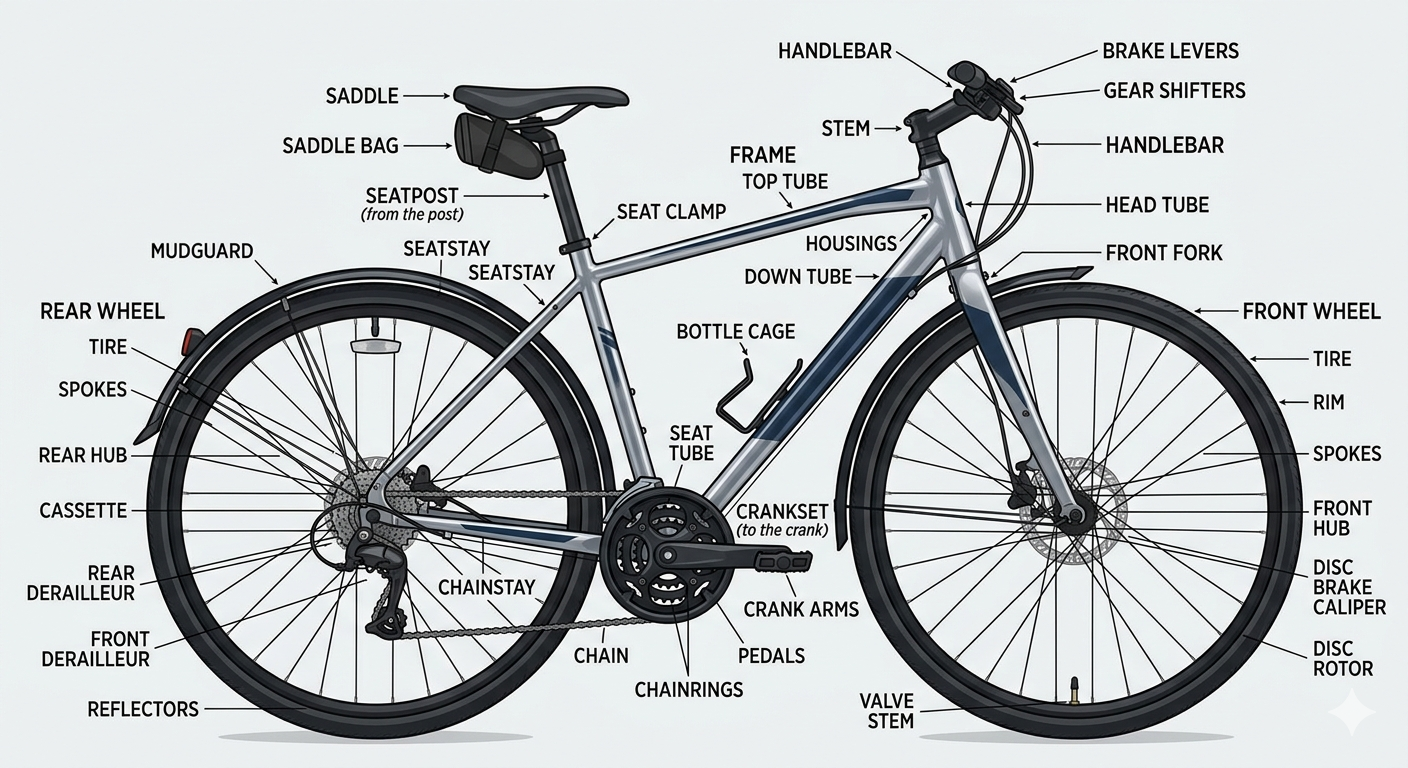
Introduction
Something feels wrong on your bike. Maybe your knees ache after every ride. Maybe your hands go numb on anything longer than 30 minutes. Maybe your lower back is complaining. Maybe it’s just a vague sense that the bike isn’t quite right — it feels like work to hold your position, and you’re not sure why.
Nine times out of ten, what you’re experiencing is a fit problem. And most fit problems are fixable at home, without a mechanic, without expensive parts, and without a professional bike fit — at least as a starting point.
This guide is organised around symptoms rather than adjustments. Find what feels wrong, and we’ll work backwards to what’s likely causing it and how to fix it.
The Most Common Problems and What Causes Them
Problem 1: Knee Pain
What it feels like: pain or pressure at the front of the knee during or after rides, or pain at the back of the knee — sometimes both at different times.
Pain at the front of the knee (below the kneecap) → saddle too low. Your knee is working at a compressed angle through every pedal stroke.
Pain at the back of the knee → saddle too high. You’re overextending your leg to reach the bottom of each pedal stroke.
Pain that moves or appears on both sides → saddle fore-aft. A saddle too far forward puts extra load on the knee joint. Check fore-aft after you’ve ruled out height.
Where to start: adjust saddle height first. Move in 2–3mm increments only, and ride for at least 30 minutes between adjustments before evaluating.
→ Full fix: The Adjustments That Can Change Everything
Problem 2: Numb Hands
What it feels like: tingling or numbness in the fingers, palm, or wrist during or after rides. Usually gets worse on longer rides or rougher surfaces.
Too much reach → your bars are too far away and you’re bearing weight on your hands to compensate. Most common cause.
Bars too wide → wide bars force an awkward grip angle that compresses the nerves in your hands.
Bar tape too thin → once you’ve checked reach and width, padding is worth looking at. Treat this as a last resort.
Where to start: check reach first. Your elbows should have a soft, relaxed bend — not locked out straight.
→ Full fix: Handlebars Aren’t One Size Fits All.
Problem 3: Lower Back Pain
What it feels like: aching or stiffness in the lower back during or after rides. Gets worse on longer rides.
Saddle too high → even a few millimetres too high causes your hips to micro-rock with every pedal stroke, putting strain on your lumbar spine.
Handlebar reach too long → reaching forward with arms locked out means your lower back absorbs the tension of holding that position for the entire ride.
Where to start: drop your saddle 2–3mm first. If the pain persists after a few rides, look at your handlebar reach next.
Problem 4: Saddle Discomfort
What it feels like: pressure, soreness, or numbness in the sit bone area or soft tissue. Worsens significantly on longer rides.
Saddle nose tilted up → even slightly nose-up pushes your weight forward onto soft tissue. The most commonly missed adjustment.
Saddle too far forward → positions your weight toward the narrow nose of the saddle.
Wrong saddle shape → if you’ve adjusted tilt and fore-aft and the discomfort persists, the saddle itself may be the wrong shape for your body.
Where to start: tilt first. Use a spirit level app on your phone — aim for level or 1–2 degrees nose-down.
Problem 5: Creaking Noise
What it feels like: a rhythmic creak, click, or squeak that seems to come from the middle or bottom of the bike. Usually happens on every pedal stroke.
Work through these in order before assuming something is seriously wrong:
Pedals → most common culprit. Remove, clean the threads, apply grease, reinstall. Remember: the left pedal has a reverse thread — turn clockwise to remove.
Seatpost → remove, clean the inside of the seat tube and the post, apply fresh grease (alloy) or carbon paste (carbon), reinstall to the correct torque.
Saddle rails and clamp → check for any play or movement. Clean the contact points and retighten.
Stem and handlebar clamp bolts → check torque. Undertightened bolts can creak under load.
Headset → rock the bike with the front brake applied. A clunk or movement means the headset needs adjustment — take it to a shop if you haven’t done this before.
Bottom bracket → if none of the above resolve it, take it to a shop.
Not sure that's your problem? Let's narrow it down →The Tools You Need
- Allen key set (4mm, 5mm, 6mm) — covers 90% of bolts on most bikes
- Torque wrench — non-negotiable if your bike has any carbon parts
- Tape measure — for saddle height and shoulder width measurements
- Floor pump with gauge — check tyre pressure before every ride (road: 80–110 psi, gravel: 30–60 psi)
- Grease and carbon paste — regular grease for metal-on-metal, carbon paste for carbon contact points
- Phone spirit level app — free, accurate, useful for checking saddle tilt
How to Make Each Adjustment
Saddle height: Loosen the seat clamp bolt (4mm or 5mm Allen key). Adjust to your target height — measured from the centre of the bottom bracket to the top of the saddle along the seat tube. Retighten. Note your starting position before touching anything.
Saddle fore-aft and tilt: Saddle clamp bolts sit underneath the saddle — one or two bolts depending on your seatpost. Loosen just enough to move. Hold the saddle firmly in position as you retighten.
Handlebar height (spacer method): Loosen the top cap bolt (centre of stem). Loosen the two stem clamp bolts on the sides. Move spacers — below the stem raises the bars, above lowers. Retighten the top cap first (just enough to remove headset play), then the stem clamp bolts evenly.
When to Take It to a Shop
Some problems are beyond a home fix:
- Gears skipping or not indexing properly
- Hydraulic disc brakes feeling spongy or losing power
- Creaking noise persists after working through the full checklist
- Wheel feels wobbly or out of true
- Clunk from the headset and you’re not confident adjusting it
A good bike shop service is worth doing once a year on a bike you’re riding regularly. Think of home adjustments as the maintenance between services, not a replacement for them.
Frequently asked questions
If I have knee pain, what should I adjust first?
Start with saddle height — it's the most common cause of cycling knee pain. Pain at the front of the knee almost always means your saddle is too low. Pain at the back of the knee typically means it's too high. Adjust in 2–3mm increments and ride for at least 30 minutes between changes before evaluating. If saddle height doesn't resolve it, check your fore-aft position next.
If my hands go numb on rides, what should I check?
The most likely culprit is reach — you're bearing too much weight on your hands because you're stretched too far forward. A shorter stem or raised handlebars redistributes that weight back onto the saddle. If reach feels fine, check your handlebar width next — bars too wide force an awkward grip angle that compresses the nerves in your hands. Bar tape thickness is worth looking at too, but treat it as a last resort.
If my lower back hurts after riding, where do I start?
Lower back pain almost always traces back to your saddle or your handlebars. Start with saddle height: even a few millimetres too high causes your hips to micro-rock with every pedal stroke. Drop it 2–3mm and see if that stabilises your pelvis. If that doesn't fix it, look at handlebar reach next. The saddle and bars work as a system — if adjusting one doesn't fully solve it, the other is almost certainly contributing.
If my saddle feels uncomfortable, what do I adjust first?
Start with tilt. A saddle nose that's even slightly too high pushes weight forward onto soft tissue rather than onto your sit bones. Try tilting the nose down 1–2 degrees using a spirit level app on your phone. If that doesn't help, check your fore-aft position — a saddle too far forward shifts your weight toward the narrow nose. If you've worked through tilt and fore-aft and it still feels wrong, the saddle shape itself may not be right for your body.
My bike makes a creaking noise — what could it be?
Work through these in order: pedals first (remove, grease the threads, reinstall — most common cause by far), then seatpost (remove, clean, regrease, reinstall), then saddle rails and clamp (check for play, retighten), then stem and bar clamp bolts (check torque). If none of those fix it, rock the bike with the front brake on — a clunk means the headset needs adjustment, best done at a shop. A persisting creak after all of the above usually means the bottom bracket needs servicing.